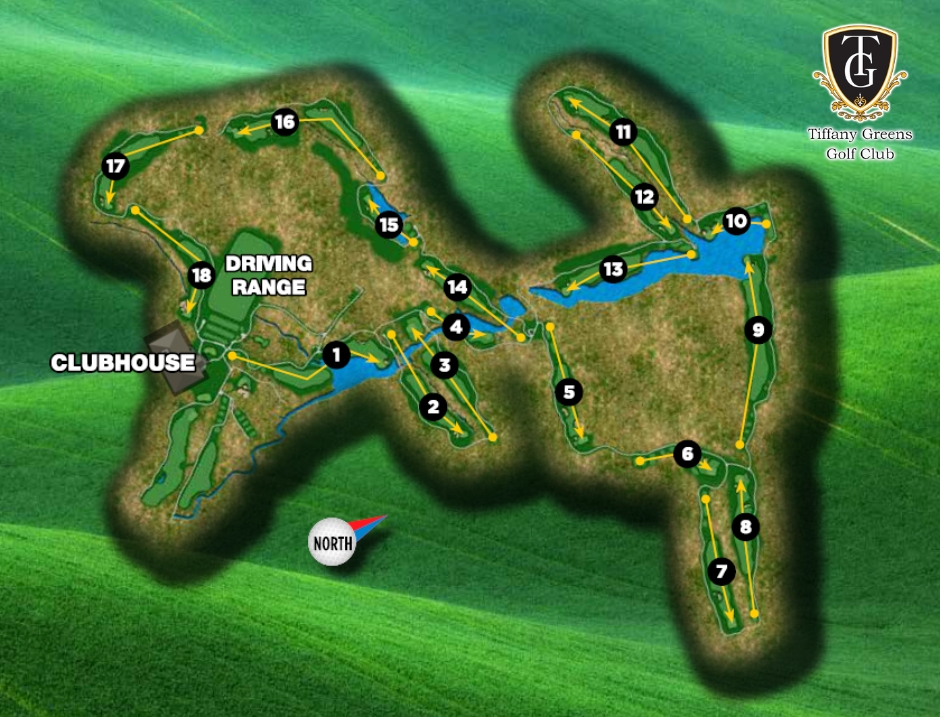
Hole 1
A unique starting hole, this par 5 offers multiple risk/reward opportunities. Big hitters may take on the trees off the tee and go toward the second fairway, or take on the green on their 2nd shot protected by water & a bunker behind the green. Manage this hole well and you can score, off a little bit and it’ll penalize you.
Hole 2

A slight dogleg left par 4 with a well-placed fairway bunker and trees lining the entire left side, make this a not-so-comfortable tee shot. Having one of the smallest greens on the course, the second shot must be managed well with trouble left, long, and bunkers to the right of the green.
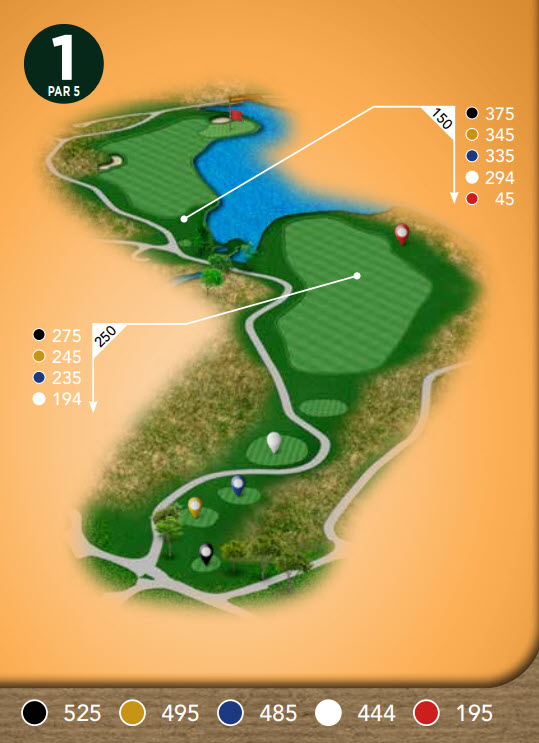
Hole 3
Positioning yourself well off the tee is a must on this difficult 2nd shot par 4. Missing the green on your approach shot makes it a very difficult up and down from any position.
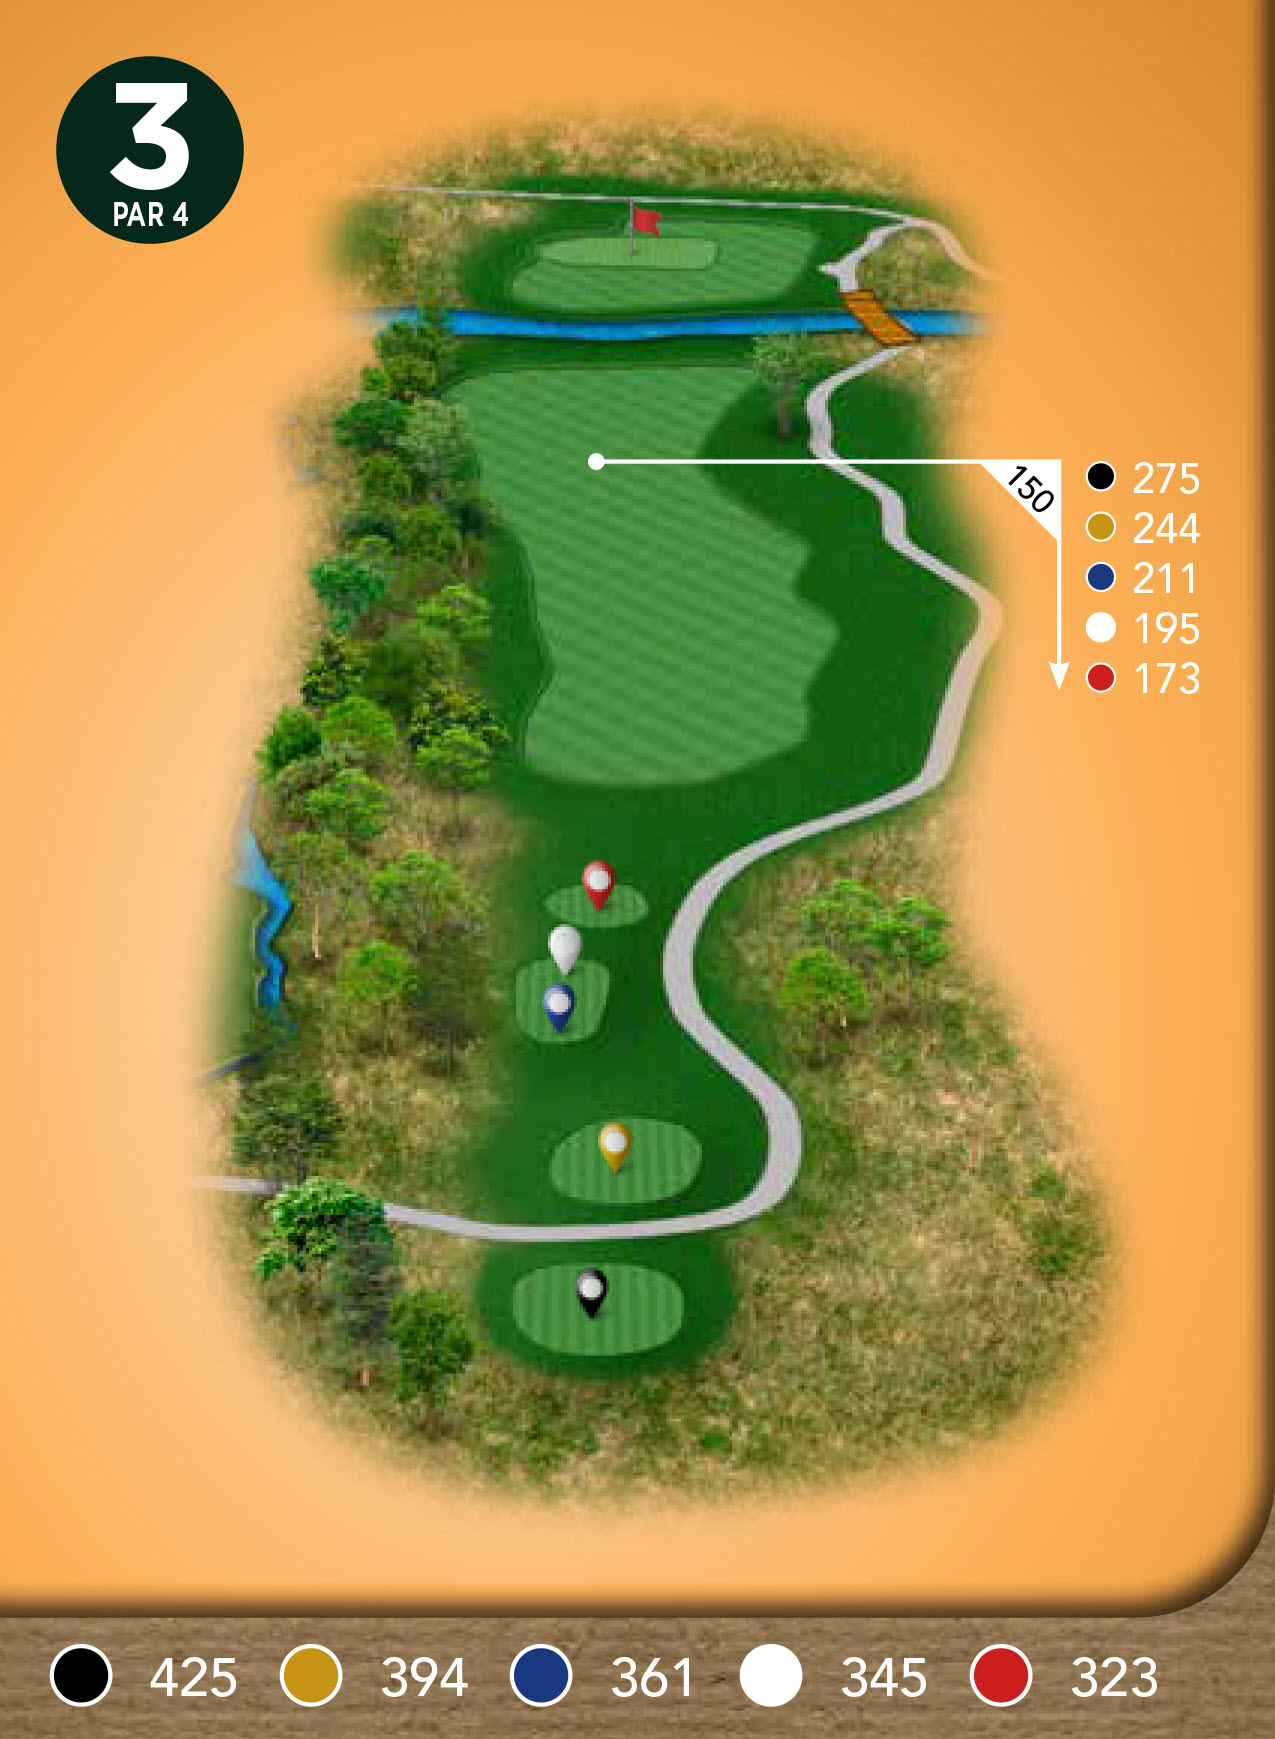
Hole 4
The first of three par 3s with a forced carry-over water. Par is a great score on this hole, birdies are rare, and high scores are common. Miss the green with the approach and you’re looking at another difficult up and down.
Hole 5
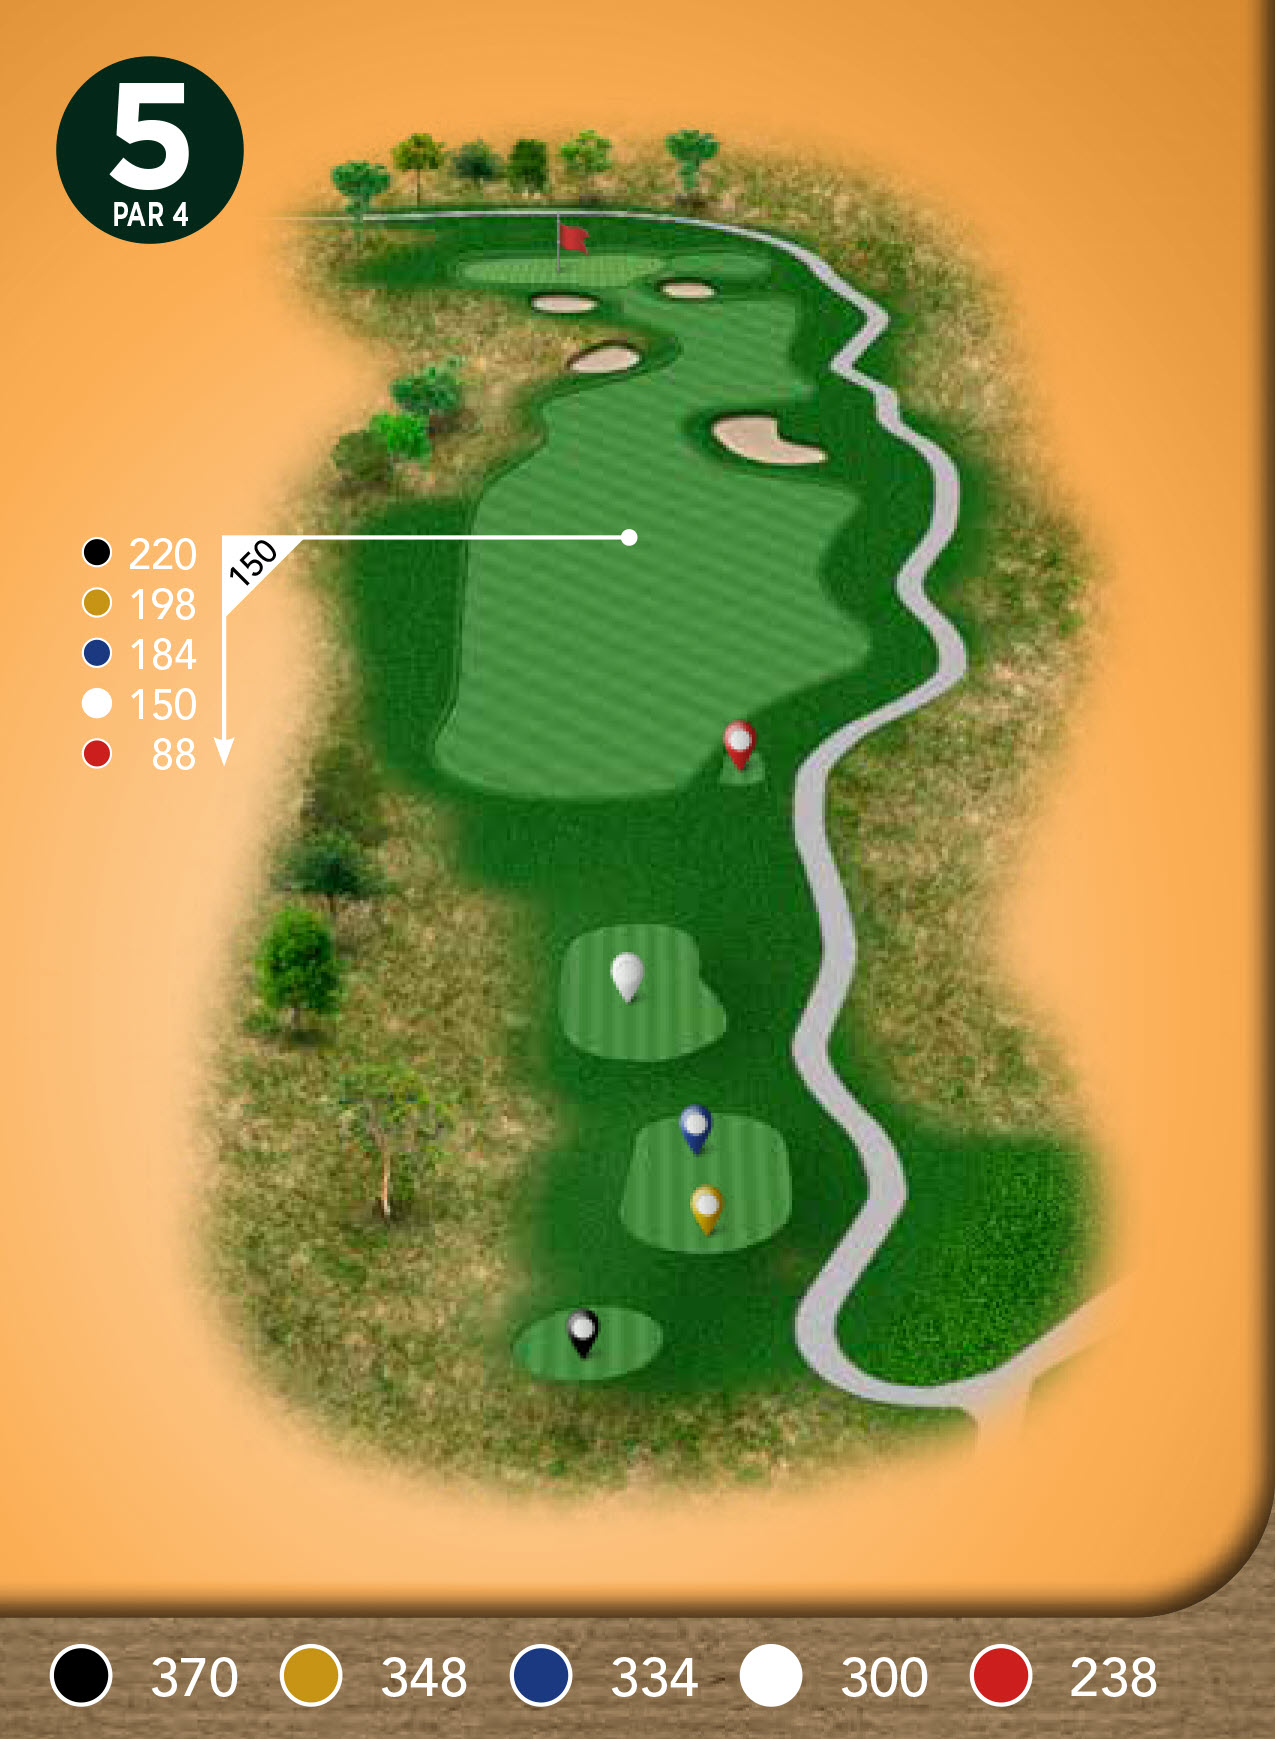
This short par 4 plays much tougher than it looks. Lay up with the tee shot to put yourself in good position for an approach to this elevated green. Guarded by bunkers short & rough long and left. Beware of the false front that swallows a lot of approach shots.
Hole 6
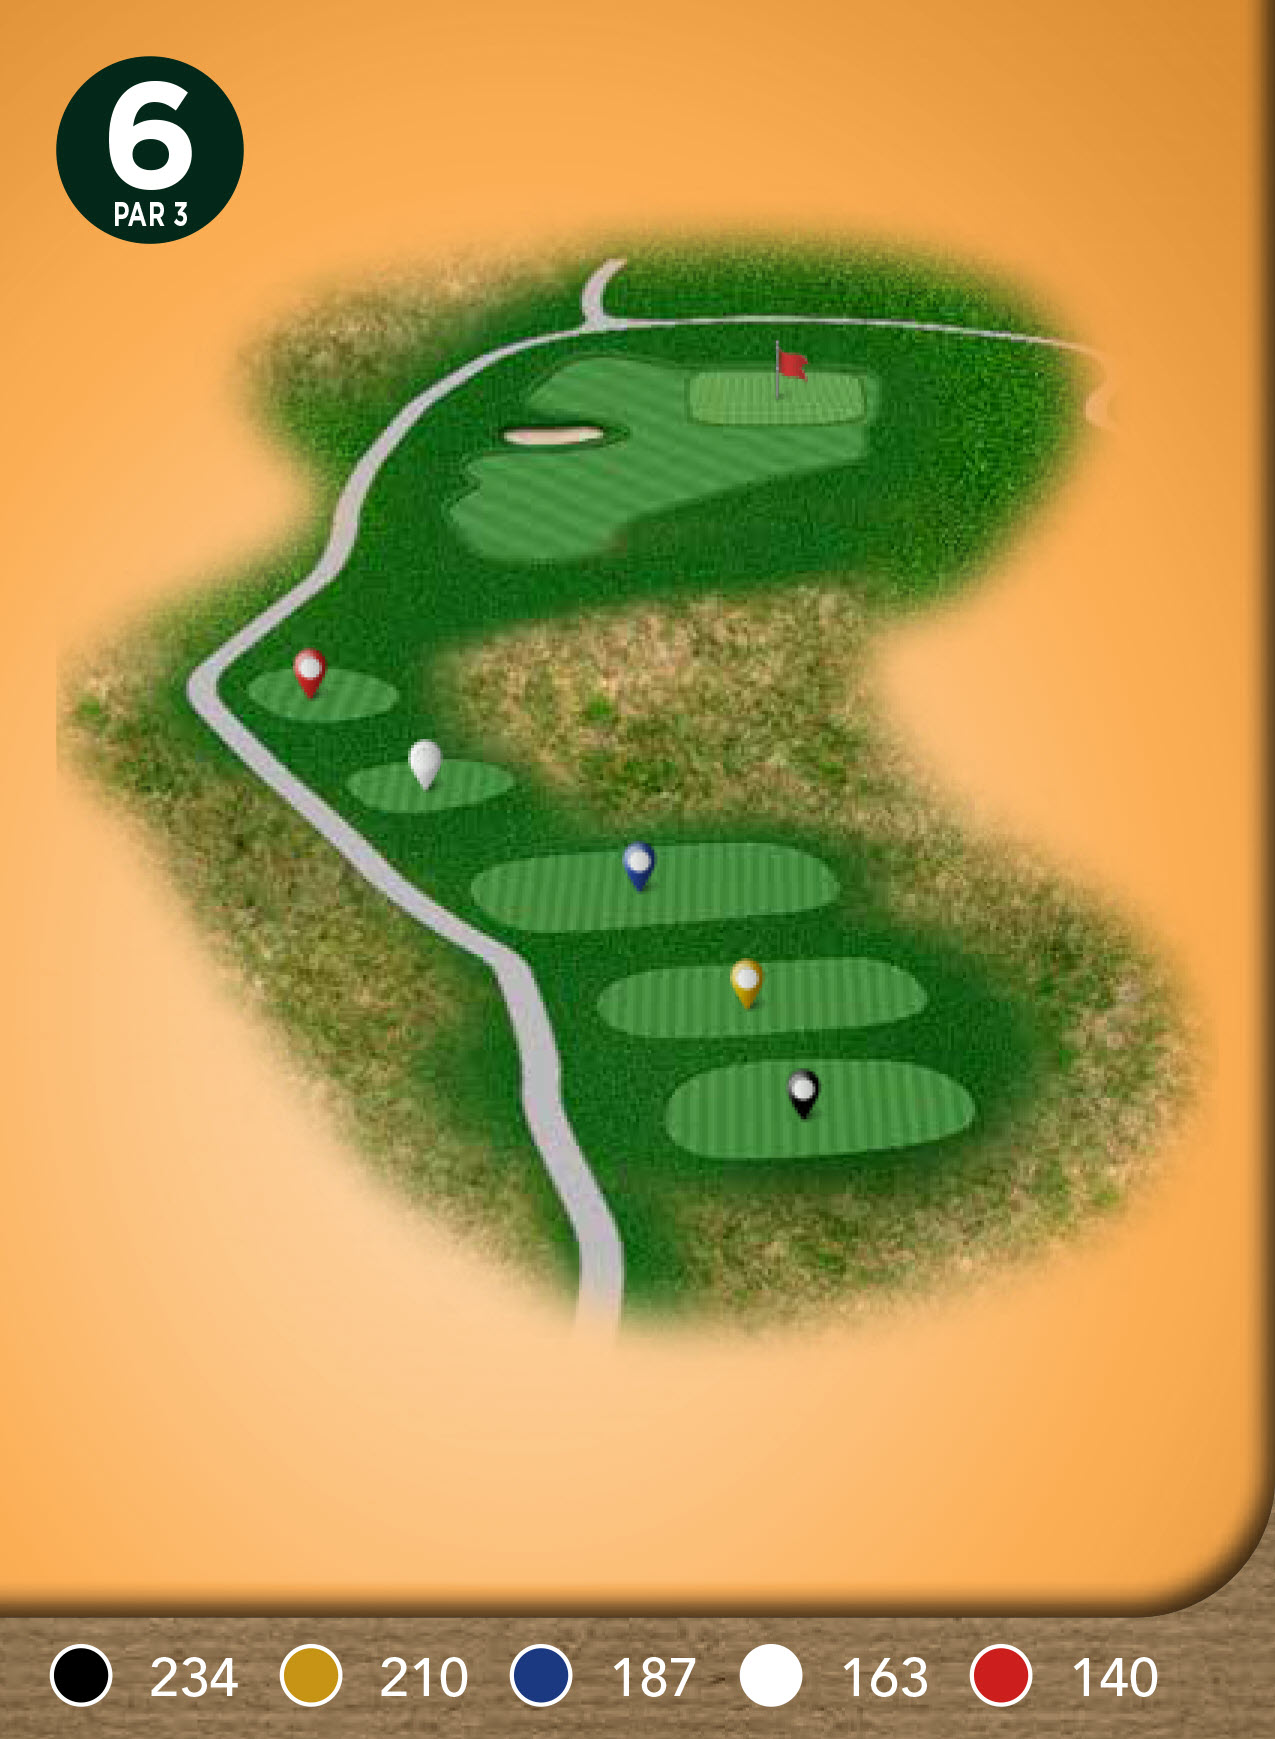
A par 3 where you get what you, with one of the largest greens on the course. Hitting the green from the tee does not guarantee you a 2-putt for par. A good hole to get aggressive on with the tee shot.
Hole 7

If Tiffany Greens had a “birdie hole,” this may be one of the only ones. A well-placed fairway bunker along with trees lining the entire left side makes you think twice before pulling the driver off the tee. A large and welcoming green awaits you on the approach shot, just don’t miss left or long.
Hole 8
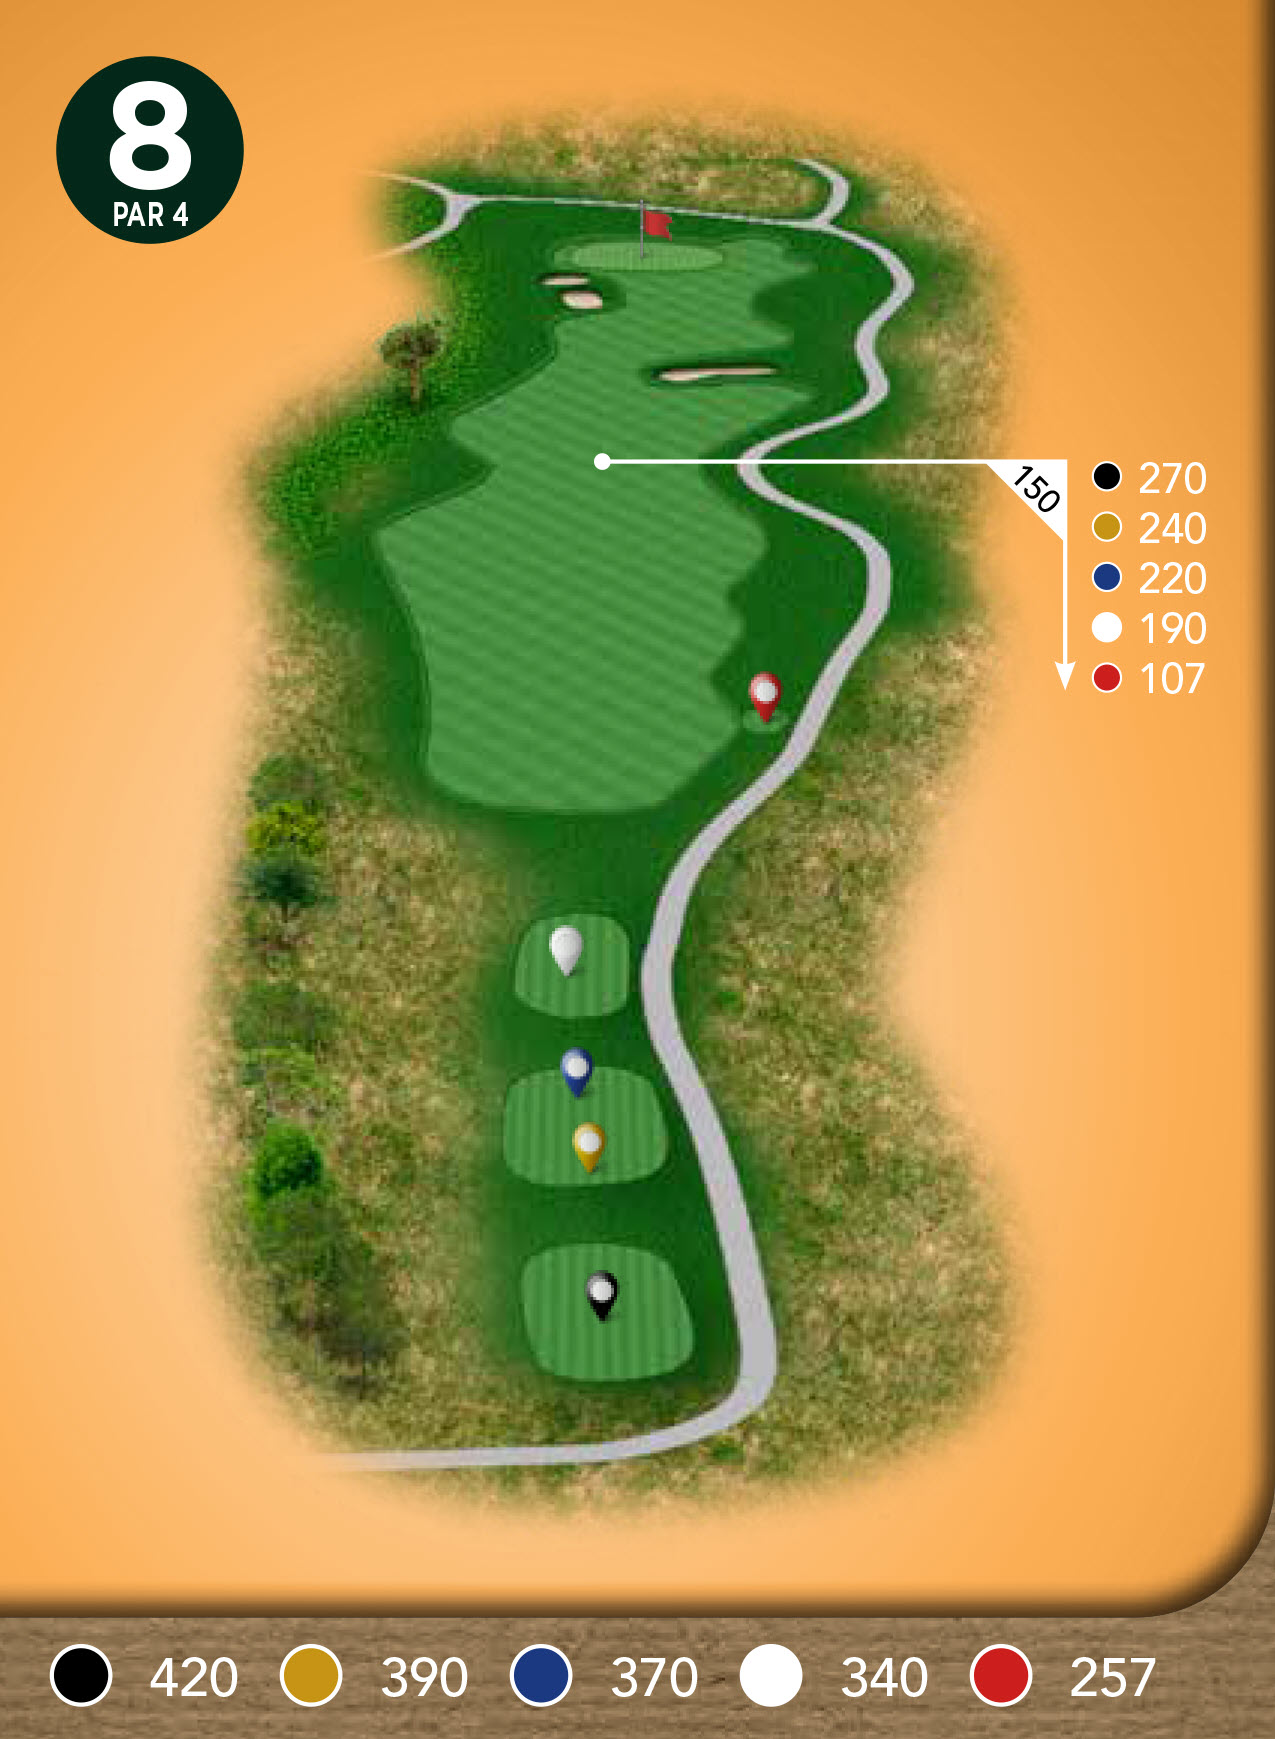
This par 4 plays longer than it looks. With the potential to lose your golf ball left and right off the tee, a well-placed tee shot is a must. Most miss their approach shot short because of the gradual but consistent slope up to the green.
Hole 9
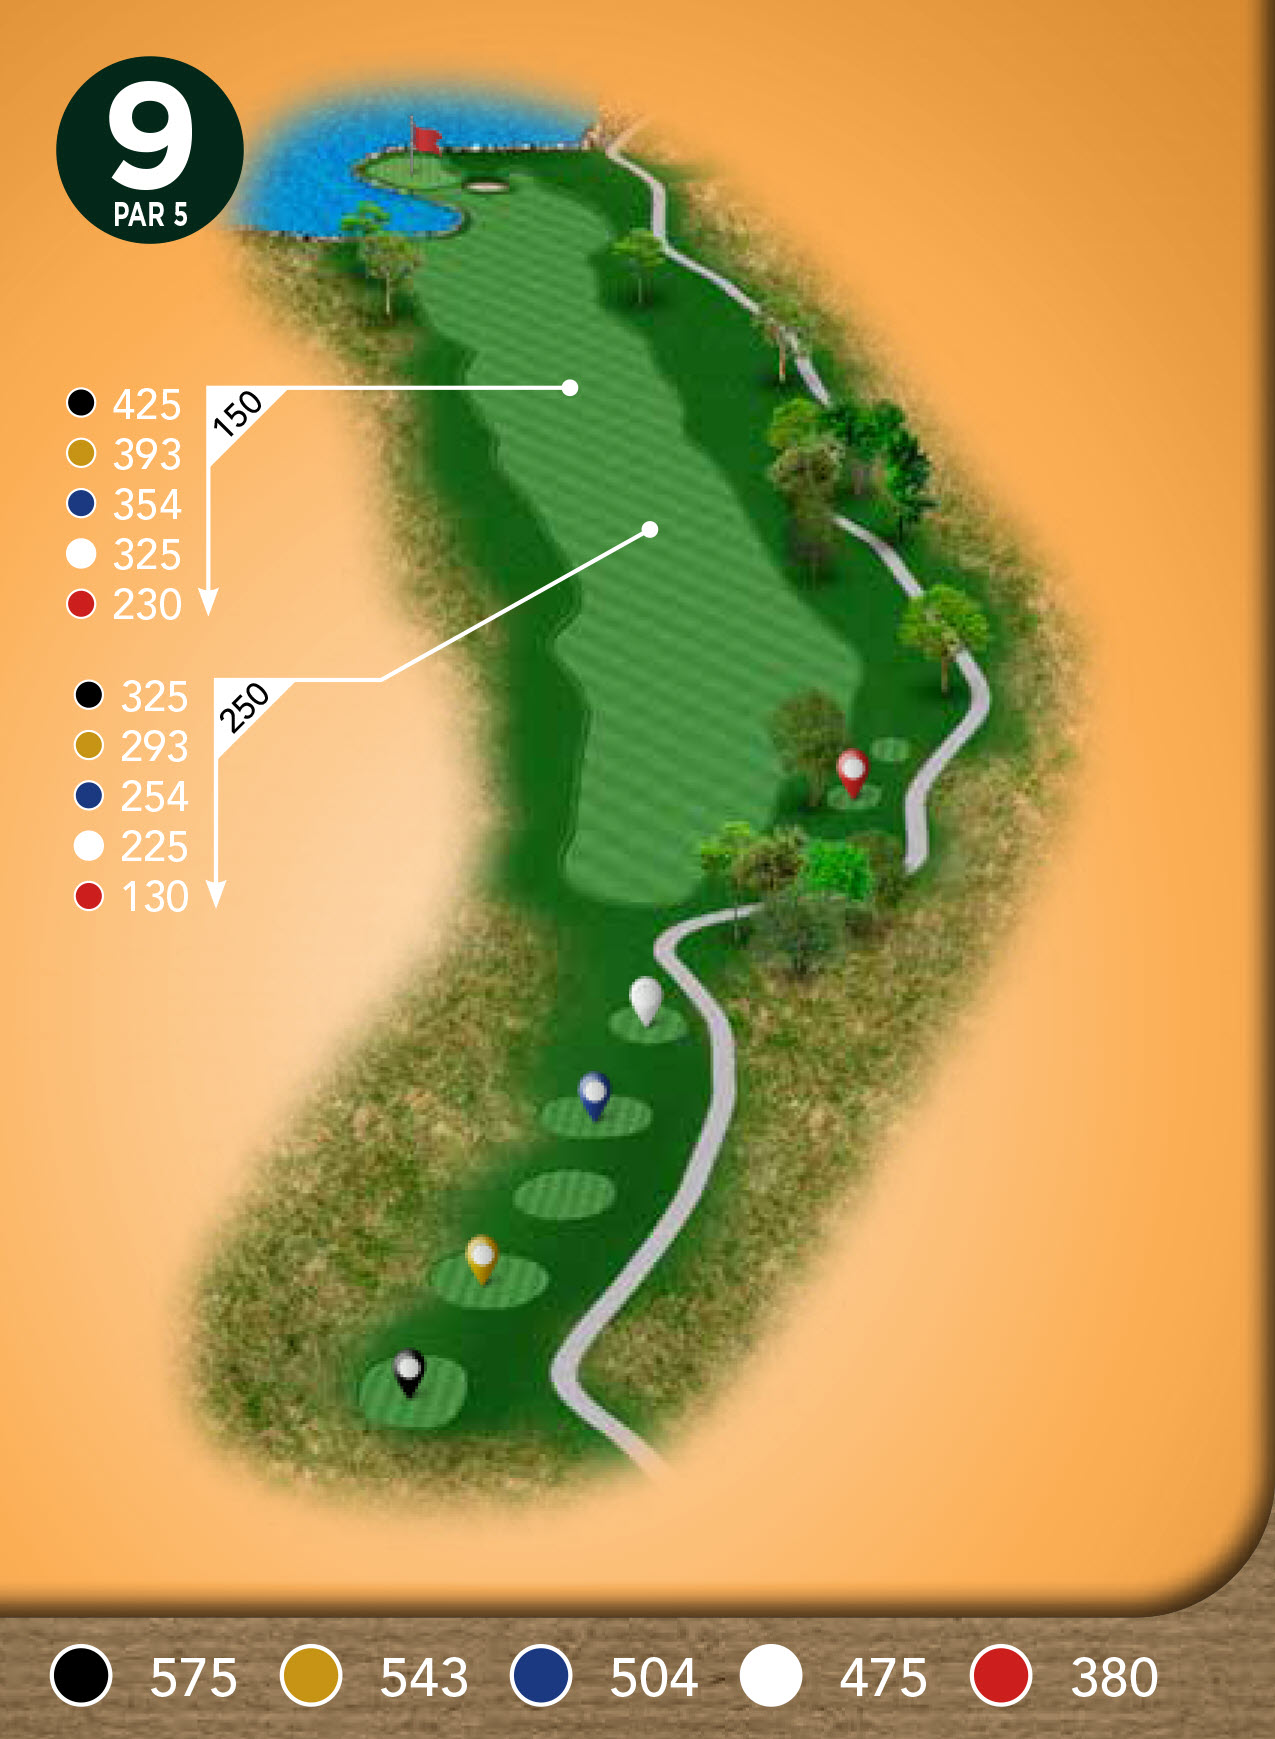
This beautiful and well-guarded green makes this a true 3-shot par 5 for almost all golfers. OB left and right, combined with heavy fescue make this wide fairway a must-hit off the tee. Then you are faced with a not so inviting green with water & a well-placed bunker defending it. Par is always a good score on this beautiful par 5.
Hole 10
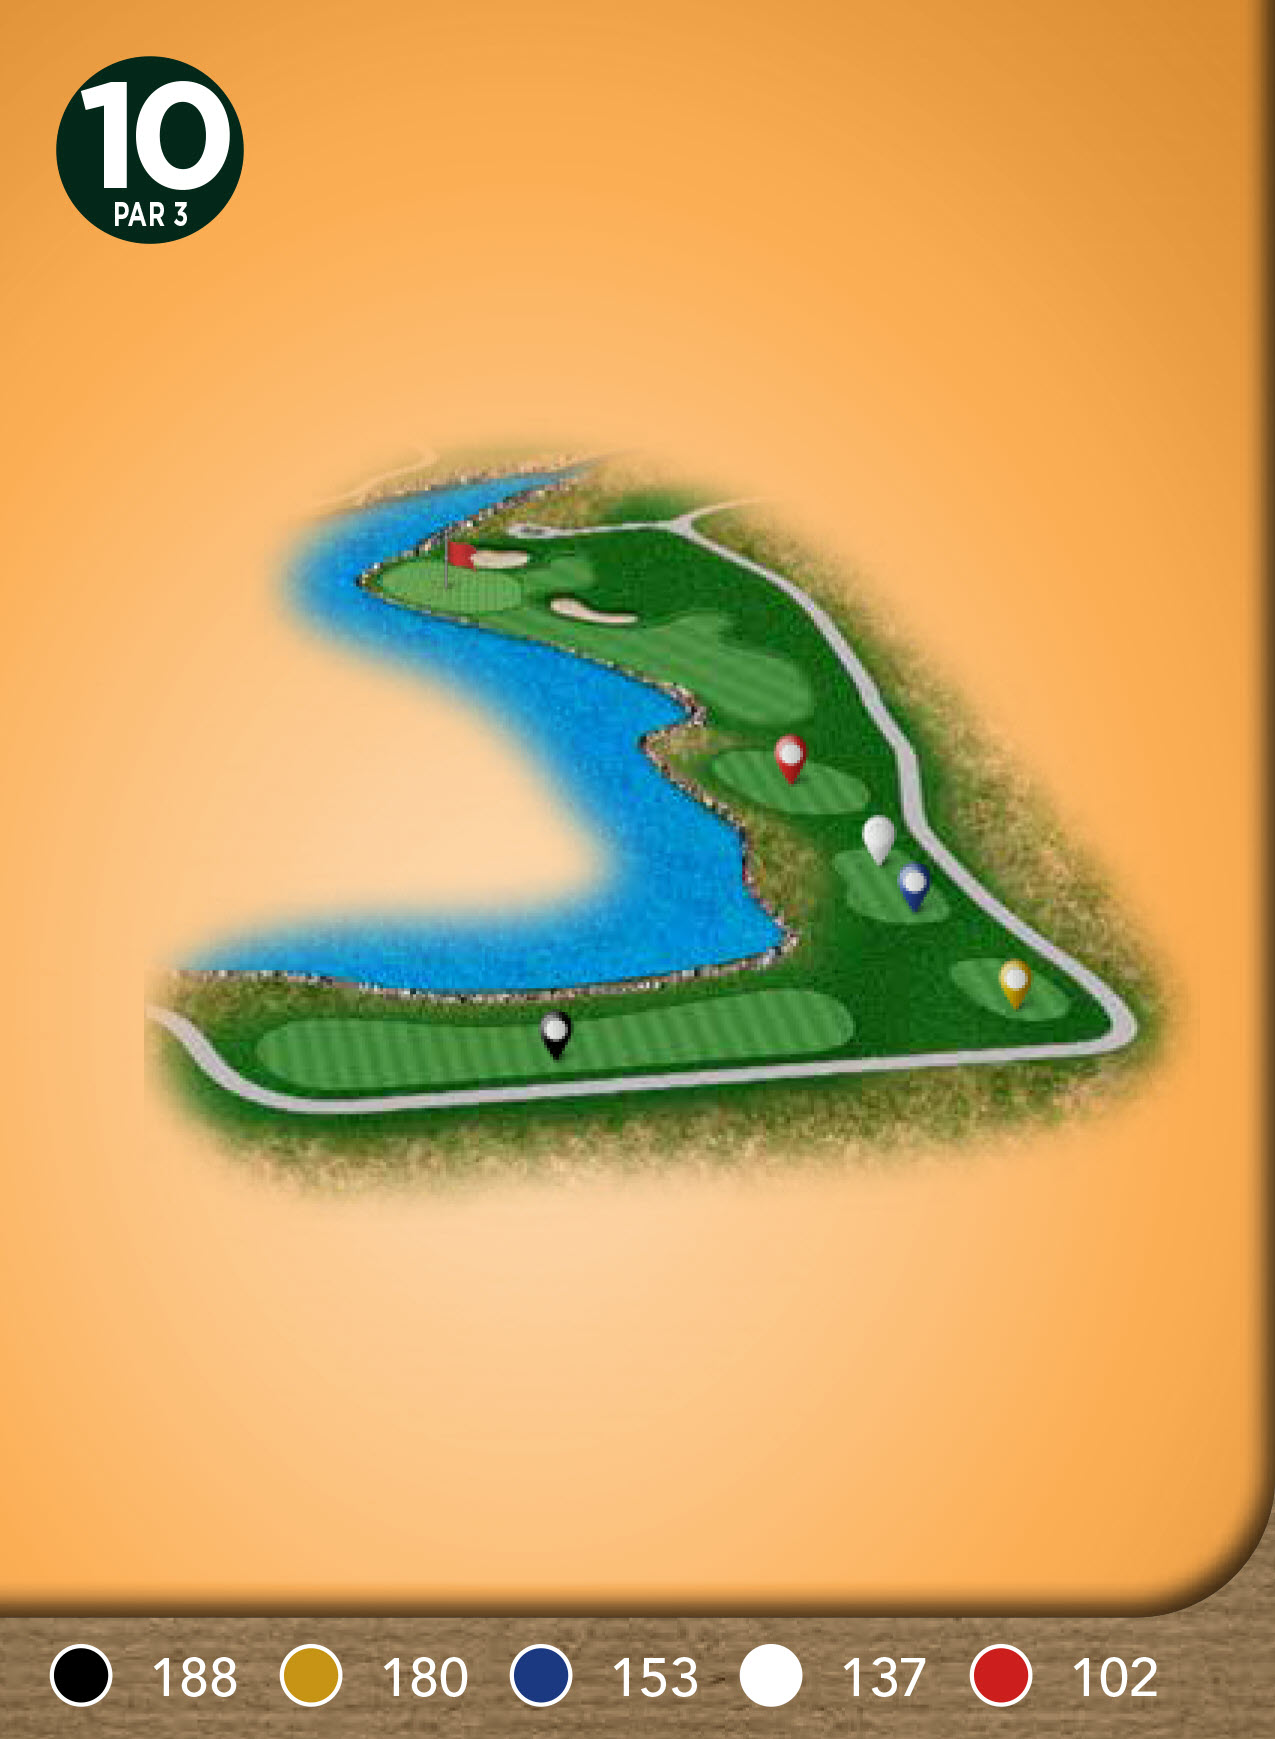
Whichever tee box you play will drastically change the look & feel of this par 3. The back tees force a carry completely over water – often into a heavy breeze. The upper tees do not force a tee shot over water, however, the angle of the green gets smaller – as so does your target. The 3rd of four difficult par 3s at Tiffany Greens.
Hole 11
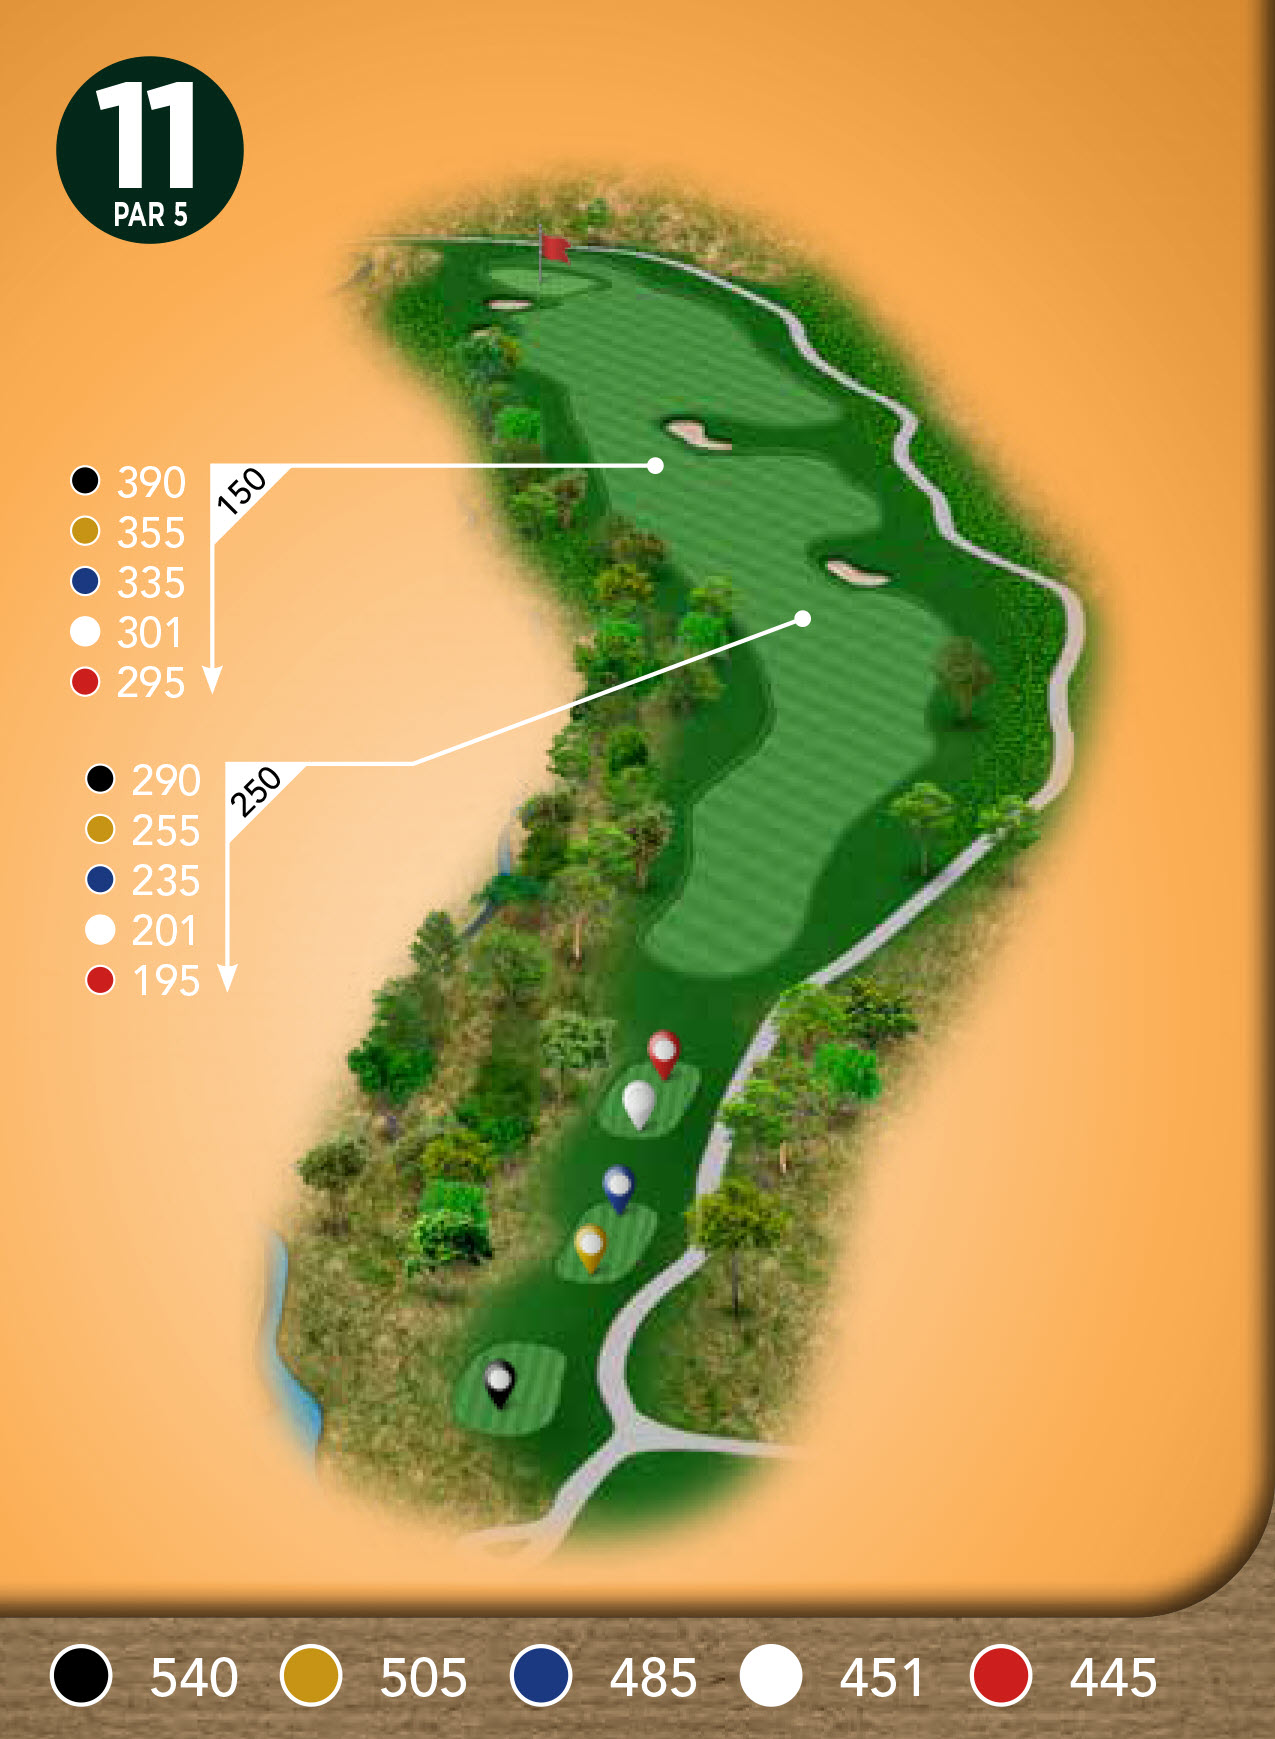
Don’t miss left! As long as you don’t go too far left anywhere on this tree-lined par 5, you should be in decent shape. A gettable par 5 that offers one of the only potential reliefs on the course. Avoid the bunkers and you can score.
Hole 12
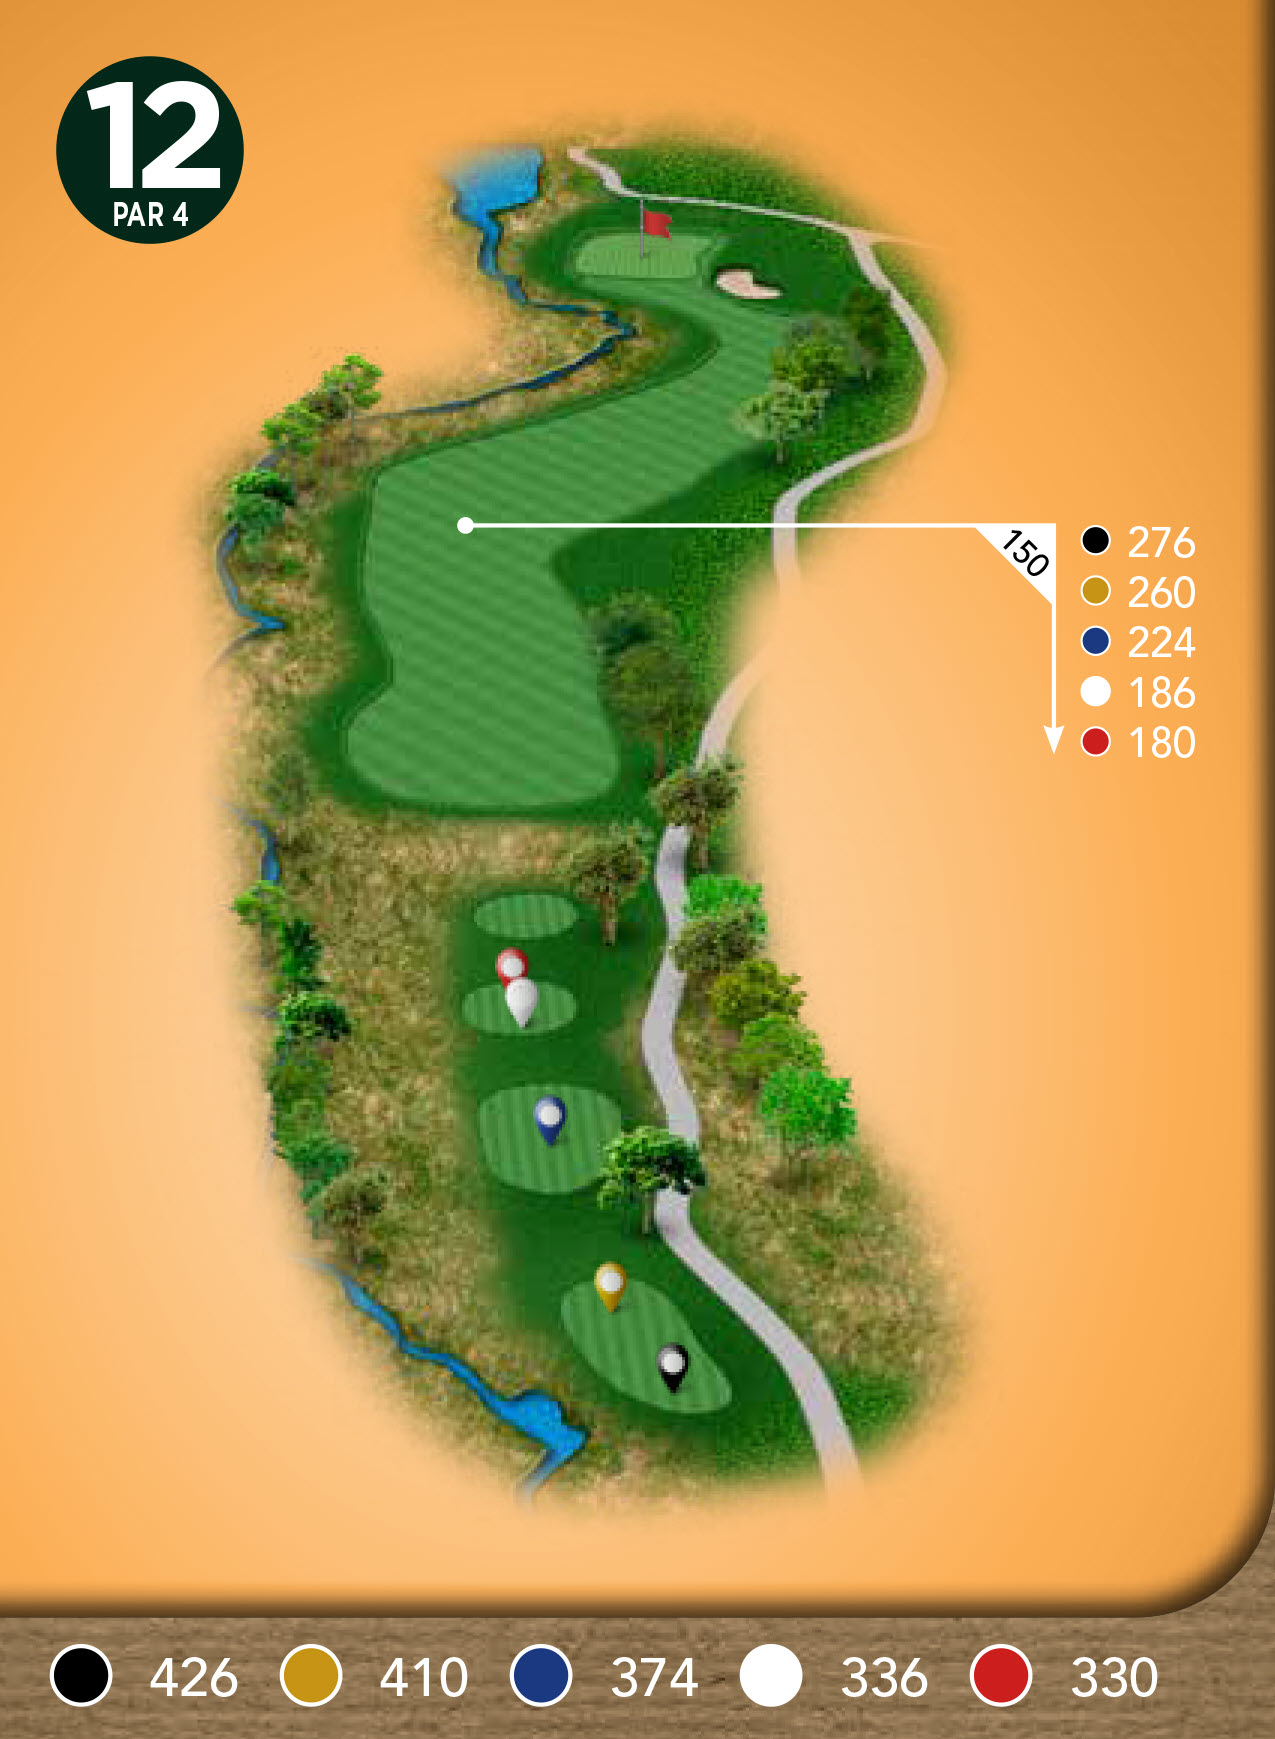
This par 4 offers the only blind tee shot on the course. Hit a beautiful drive down the middle and you may be in trouble. This fairway doglegs right off the tee before doglegging back left into the green. Tee shot options are to lay up, or hit well right of center to be in play. This well-guarded green makes getting up and downs very difficult anywhere but short.
Hole 13
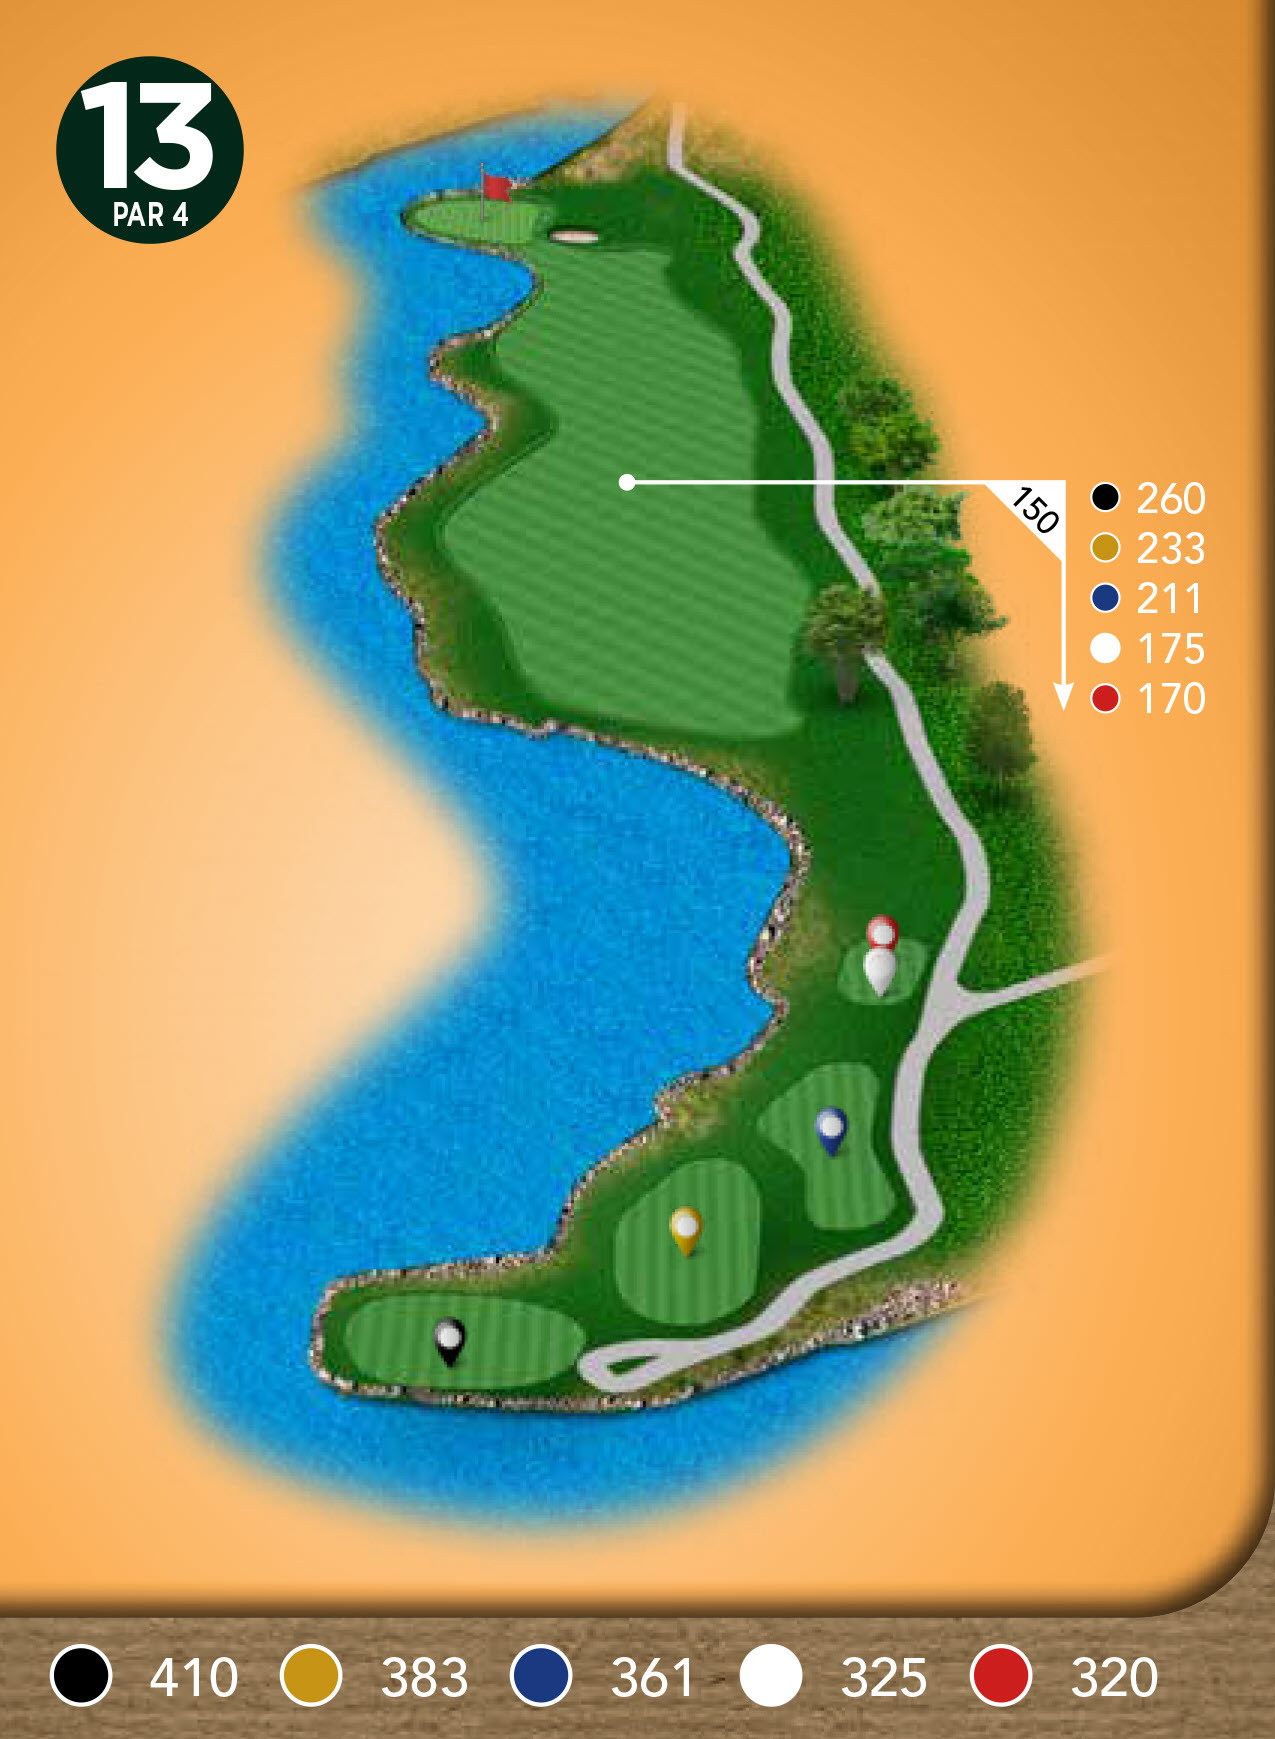
Consistently one of the toughest holes on the course, this par 4 will punish you whether you miss short, right, or left off the tee. The approach shot doesn’t get any easier with a peninsula green that is guarded by bunkers & rough where the water isn’t. Not a hole to get aggressive on.
Hole 14
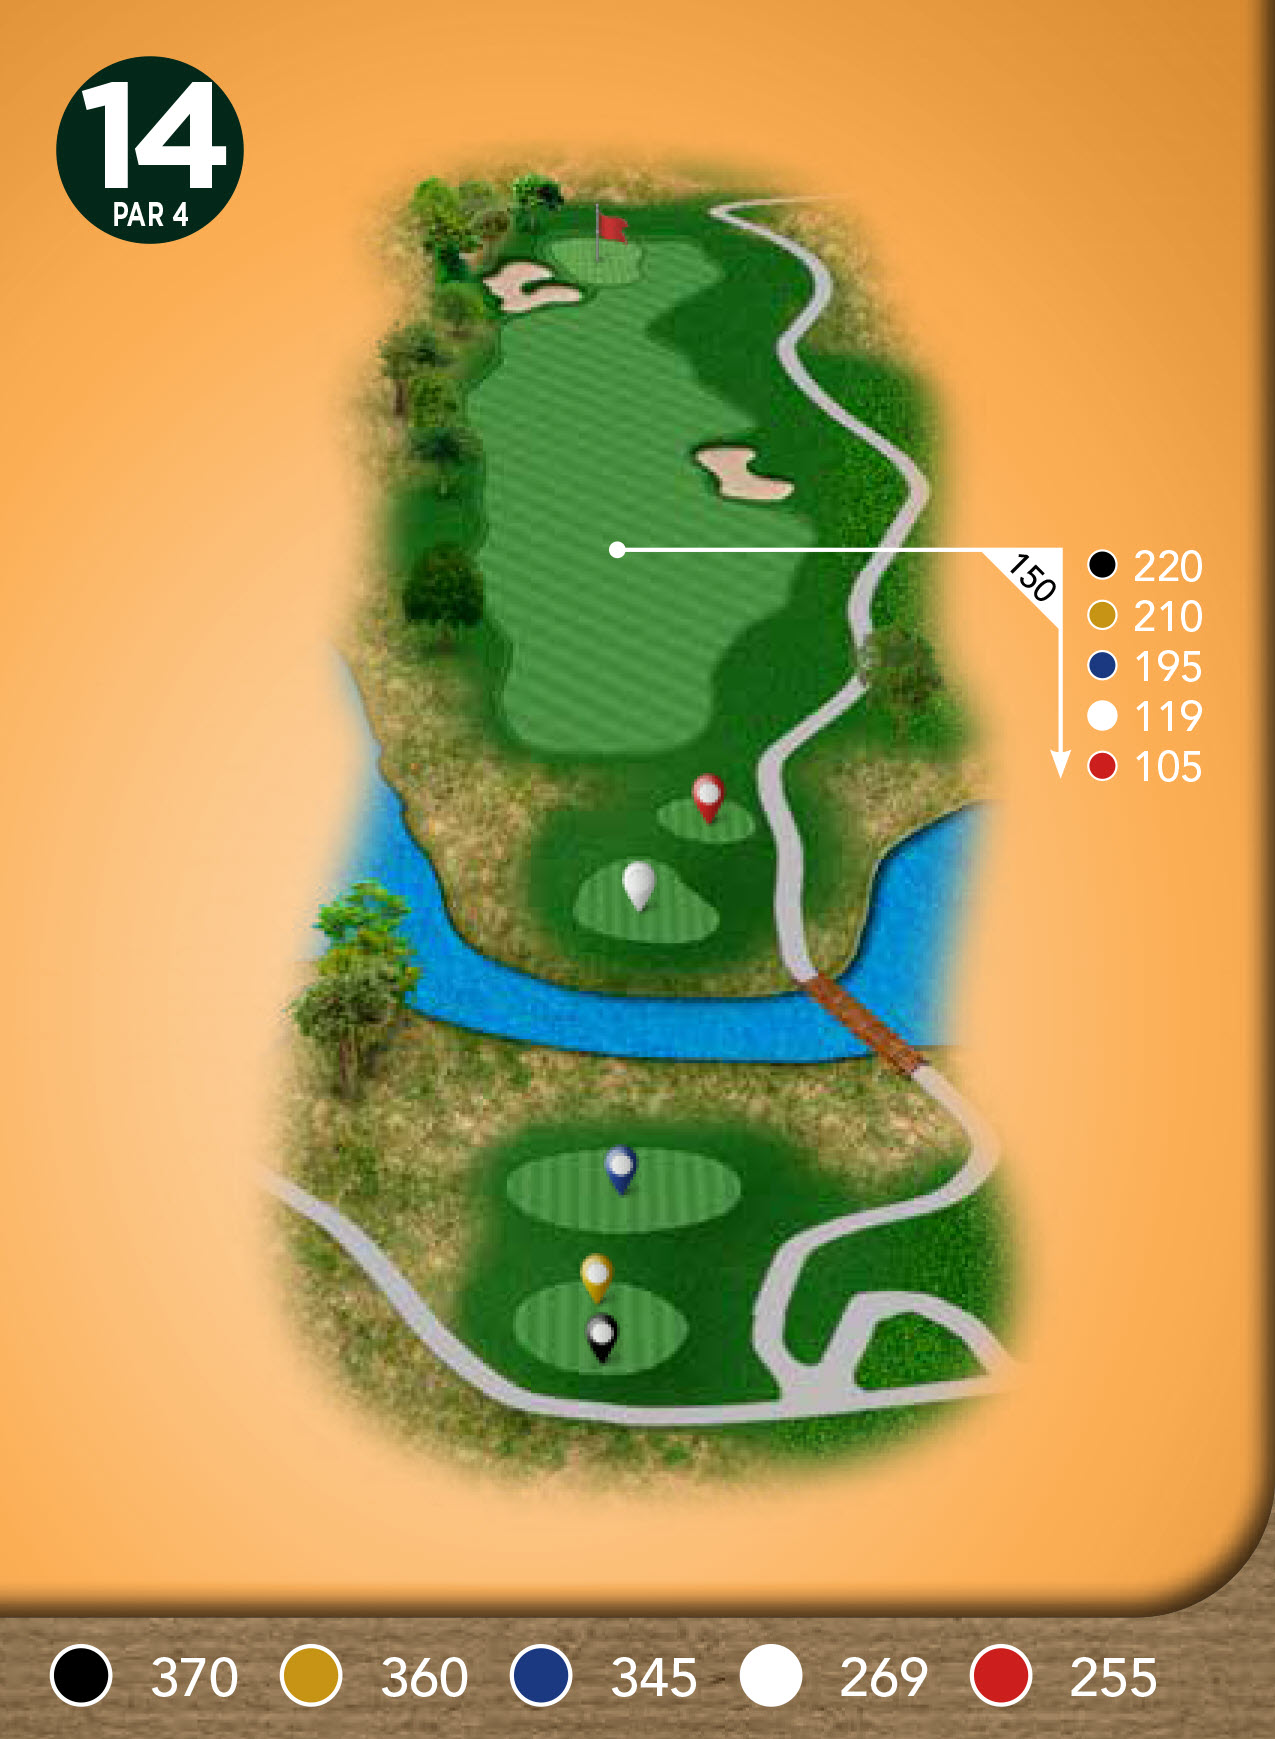
Opposite the previous hole, this hole offers a scoring opportunity. Avoid pulling it left into the trees, and you have a chance at this short par 4. Although a smaller green with a large bunker guarding it, you will usually have a shorter club into this green.
Hole 15
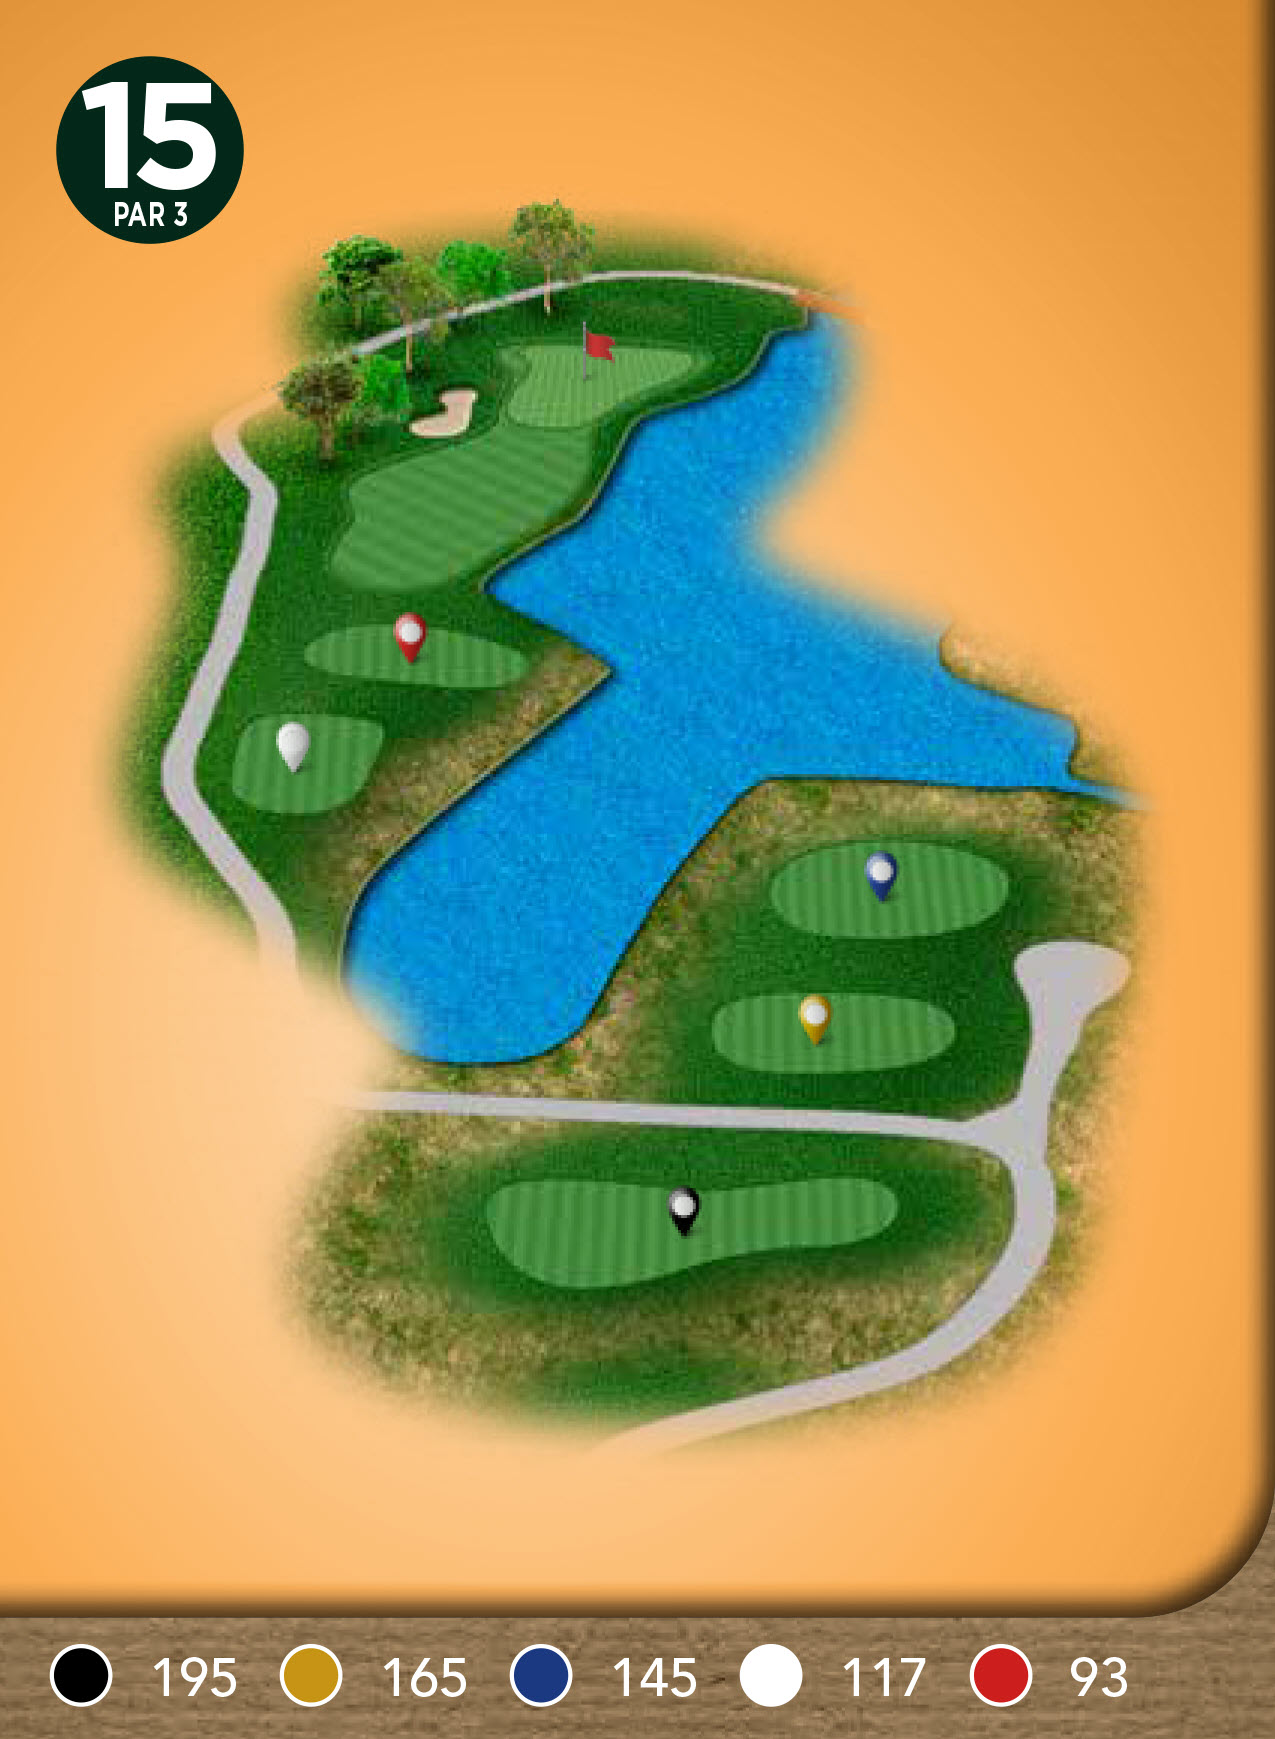
Another forced carry for most tee boxes, this par 3 is rarely welcoming. Water short, water right, bunker left, rough long, and left, there isn’t a great spot to miss this approach shot. On top of that the green slopes severely back to front, making 2 putting from anywhere a tough job. Par is always a great score.
Hole 16

A unique par 5, and one of the few holes that really doesn’t offer options off the tee. Hit the wide-open first fairway – the further left the better. Then a sharp 90-degree turn for a long and uphill second shot over a 50-yard ditch that swallows up poor shots. If you manage your first and second shots well, it can make this a gettable par 5, any mistakes and the strokes can add up quickly.
Hole 17
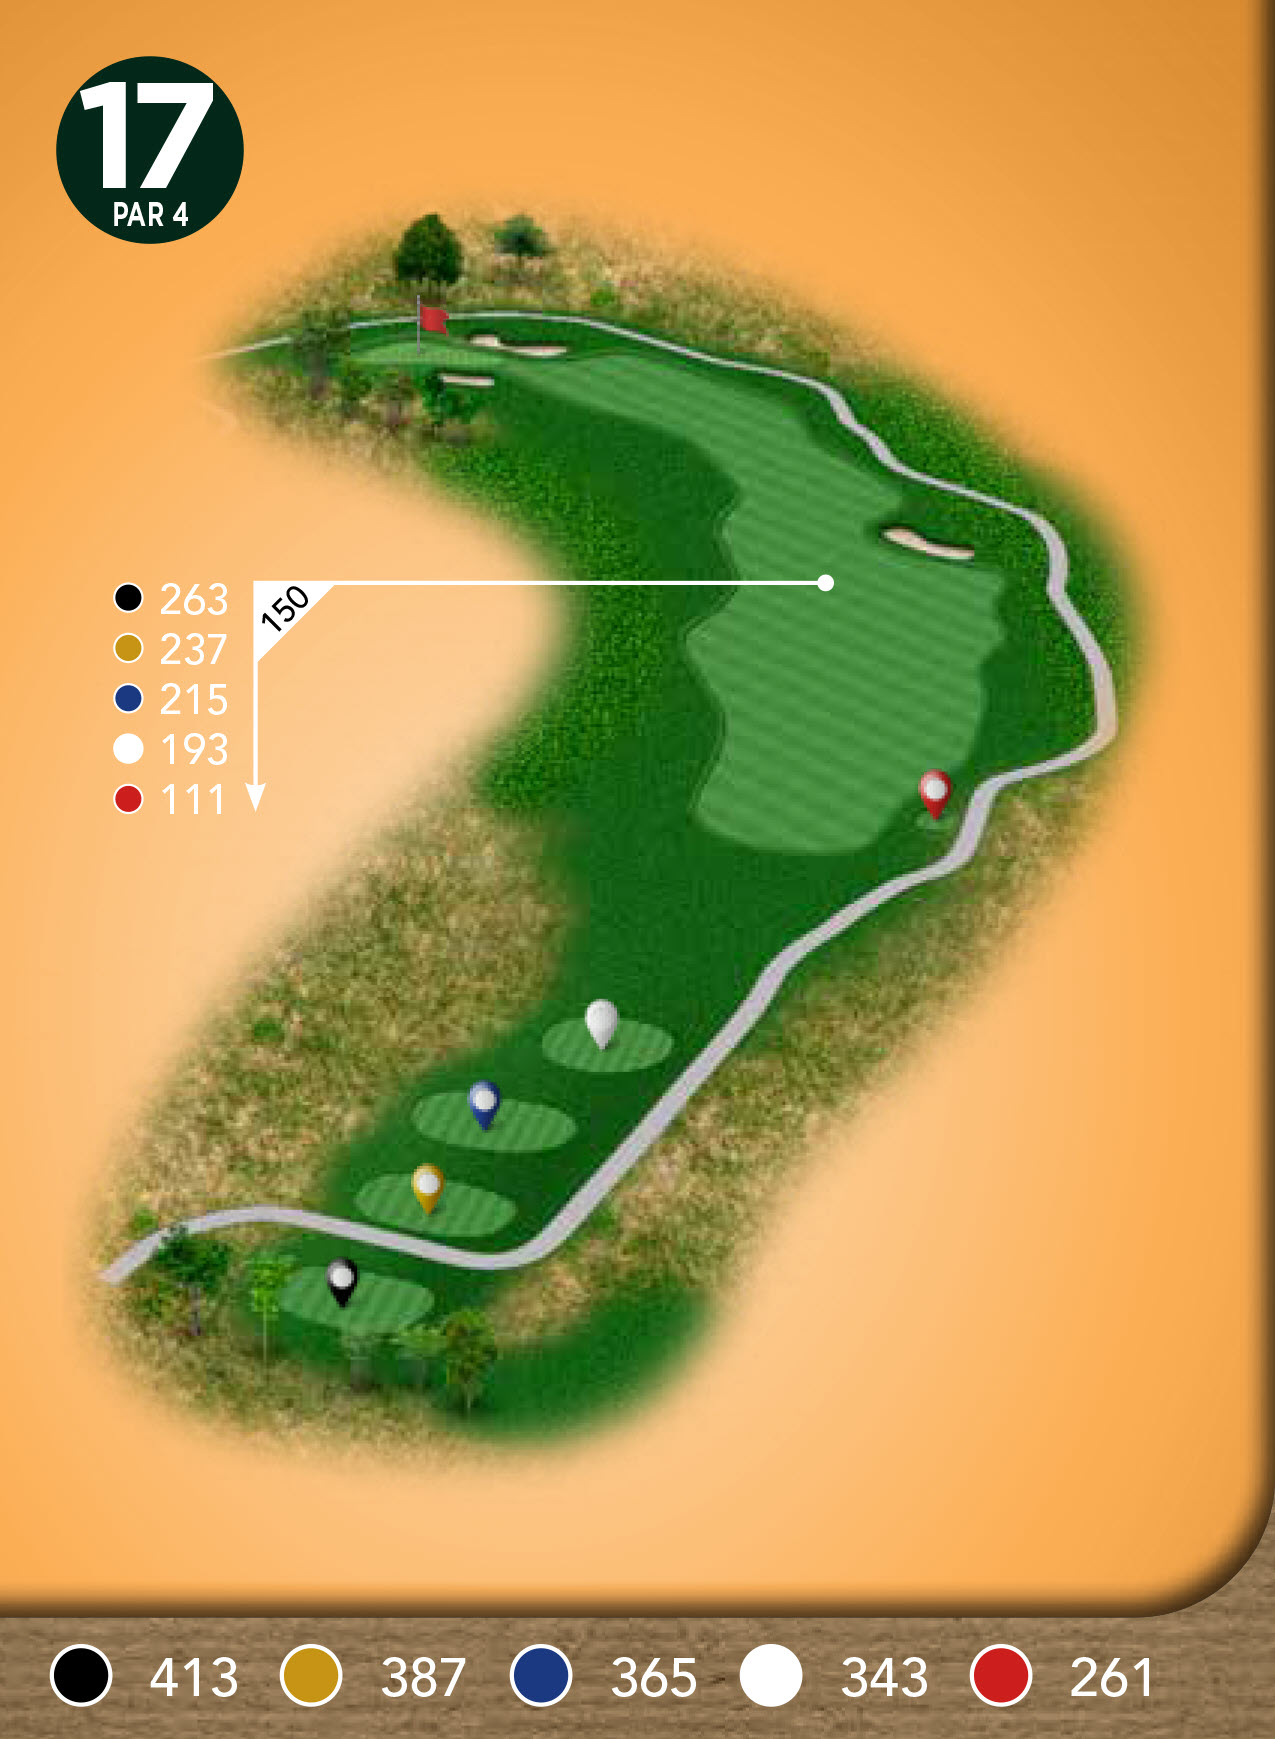
A beautiful par 4 that offers lots of options off the tee. The longer the club you choose, the smaller the landing zone you’ll have. A flat stance is key to having any success on your approach shot to this angled and difficult-to-hit green.
Hole 18
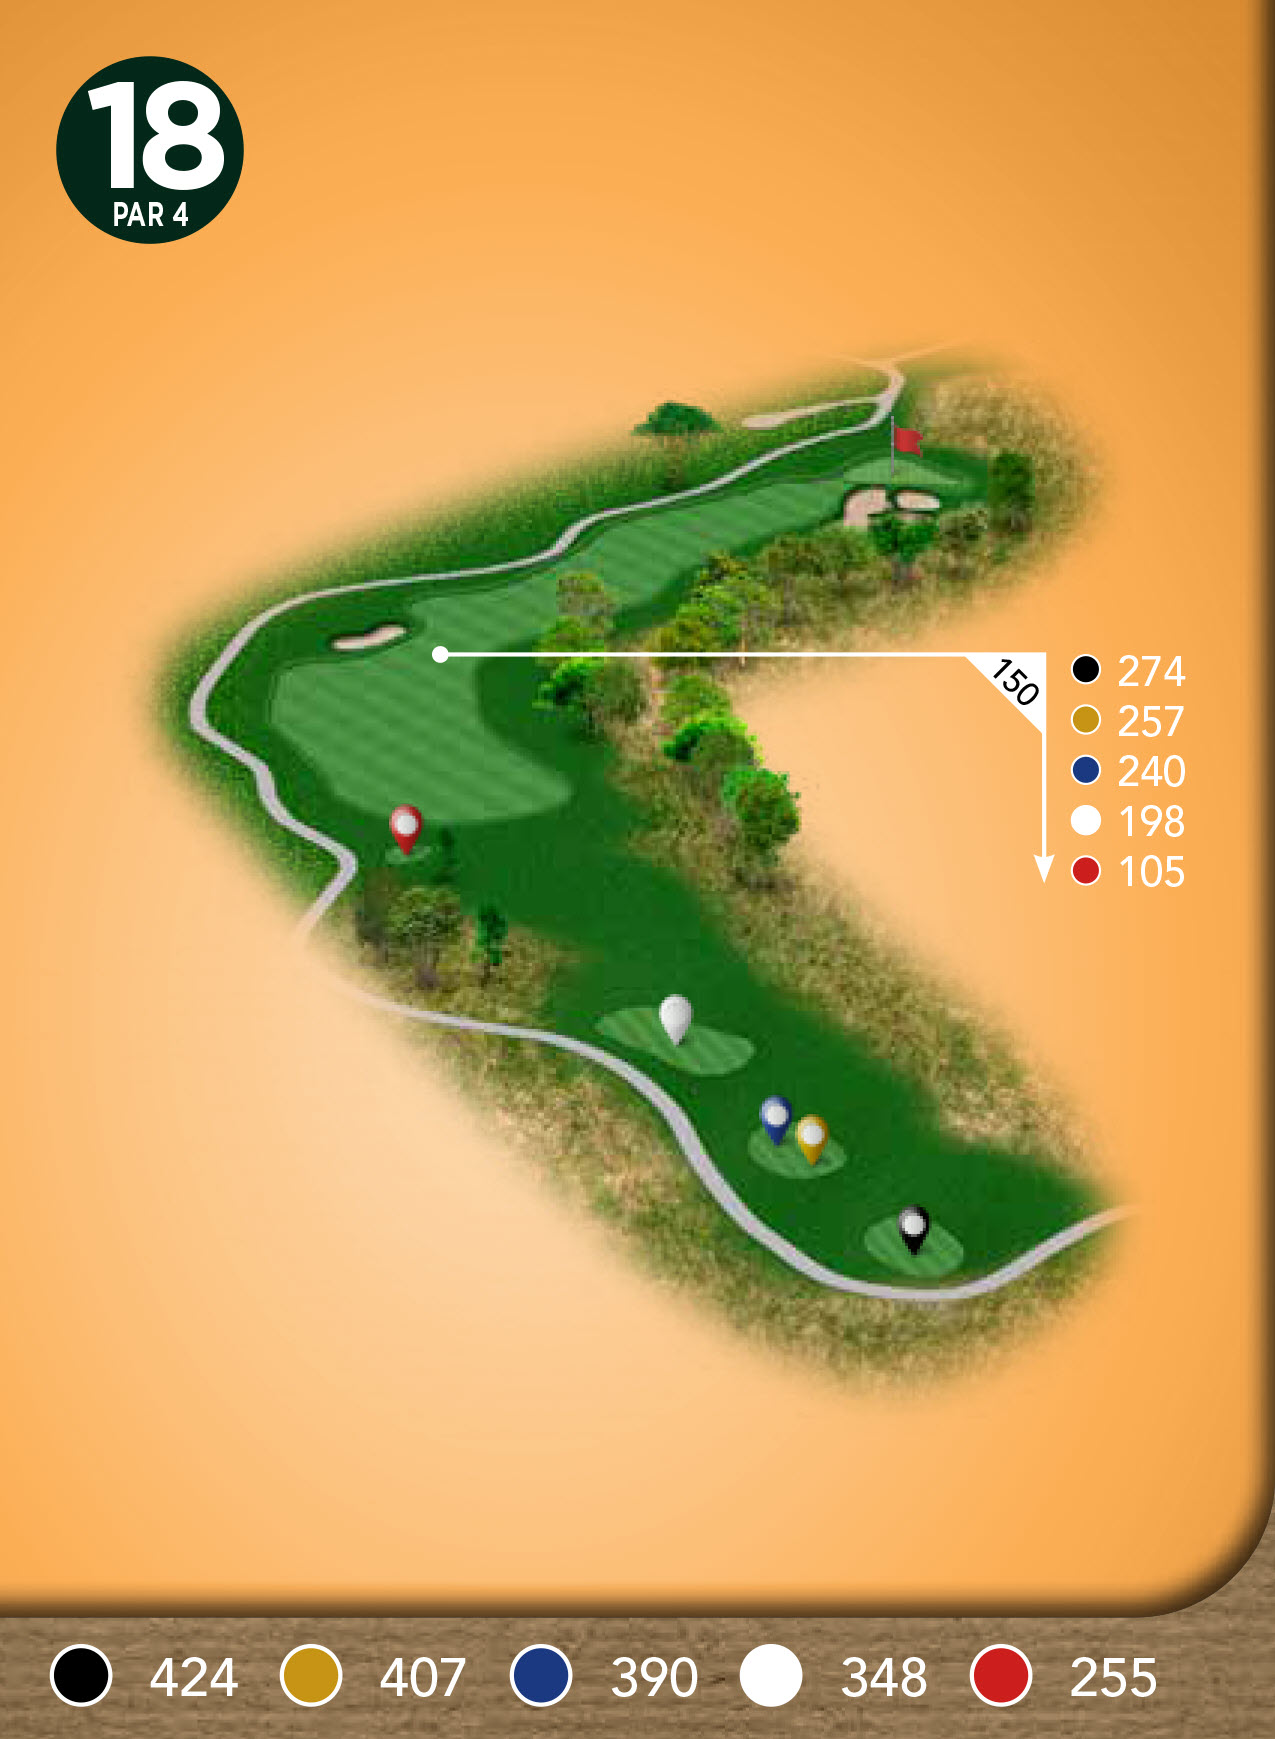
Ending a difficult few stretches of finishing holes, the 18th at Tiffany Greens is always one of the toughest holes on the course. With options to lay up off the tee, or hit a big stick over the trees to a shorter approach, a solid tee shot is key. The 18th green is very shallow to the approach and well-guarded. Par is always a good score to wrap up this beautiful but challenging layout.